zynq系列中的FPGA,都会自带两个iic设备,我们直接调用其接口函数即可运用。使用xilinx官方提供的库函数,开发起来方便快捷。
一:配置vavido
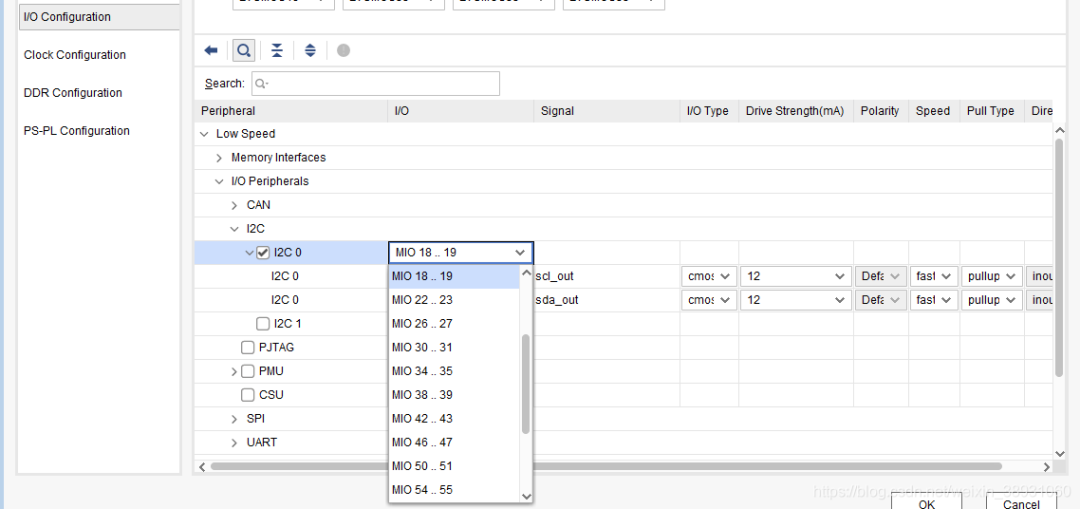
创建block design,勾选iic设备,可以看到iic的引脚可以进行这种分配,对照原理图,勾选对应的引脚即可。
二:sdk开发
创建好工程后,在sdk中对iic设备进行初始化,和对iic设备的读写操作。
首先是对iic设备进行初始化,初始化iic设备的基地址,设备id,iic时钟频率等信息。
u32 XpsIic_Initialize(XIicPs*InstancePtr,u16 DeviceID,u32 iic_clk) { int Status; XIicPs_Config *Config;// print("查找设备信息");Config = XIicPs_LookupConfig(DeviceID);if (NULL== Config) { print("查找id失败");return XST_FAILURE;} Status = XIicPs_CfgInitialize(InstancePtr, Config, Config->BaseAddress);if (Status!= XST_SUCCESS) { return XST_FAILURE;} Status = XIicPs_SelfTest(InstancePtr);if (Status!= XST_SUCCESS) { return XST_FAILURE;} /* * 设置i2c的sclk时钟 */ Status=XIicPs_SetSClk(InstancePtr, iic_clk);if (Status!= XST_SUCCESS) { print("设置clk失败");return XST_FAILURE;} return XST_SUCCESS;}
然后就是iic的读写操作,我们使用官方提供的iic接口函数,有时候也需要对其再次进行封装,这样自己使用起来比较顺手。
1:发送函数
s32 XIicPs_MasterSendPolled(XIicPs*InstancePtr, u8 *MsgPtr, s32 ByteCount, u16 SlaveAddr)
这是一个用于master的轮询发送函数,我们常用的iic发送函数模式就是轮询的,至于中断模式的,则是另一个函数XIicPs_MasterSend()。两者看起来容易混淆
4个参数:
@param InstancePtr is a pointer to the XIicPs instance. 设备指针
@param MsgPtr is the pointer to the send buffer. 待发送数据数组指针
@param ByteCount is the number of bytes to be sent. 发送数据的个数
@param SlaveAddr is the address of the slave we are sending to. 从机地址
2:接收函数
s32 XIicPs_MasterRecvPolled(XIicPs*InstancePtr, u8 *MsgPtr, s32 ByteCount, u16 SlaveAddr)
此函数也是只用于轮询模式的,不适合中断模式的读取,中断模式的接收函数叫XIicPs_MasterRecv()
四个参数:
@param InstancePtr is a pointer to the XIicPs instance. 设备指针
@param MsgPtr is the pointer to the receive buffer. 接收数据存储的地方
@param ByteCount is the number of bytes to be received. 接收到的数据个数
@param SlaveAddr is the address of the slave we are receiving from. 从机地址
对于读函数,需要在注意的地方在于需要根据实际设备的读时序进行封装,直接调用这个函数可能不会成功。
举个例子:
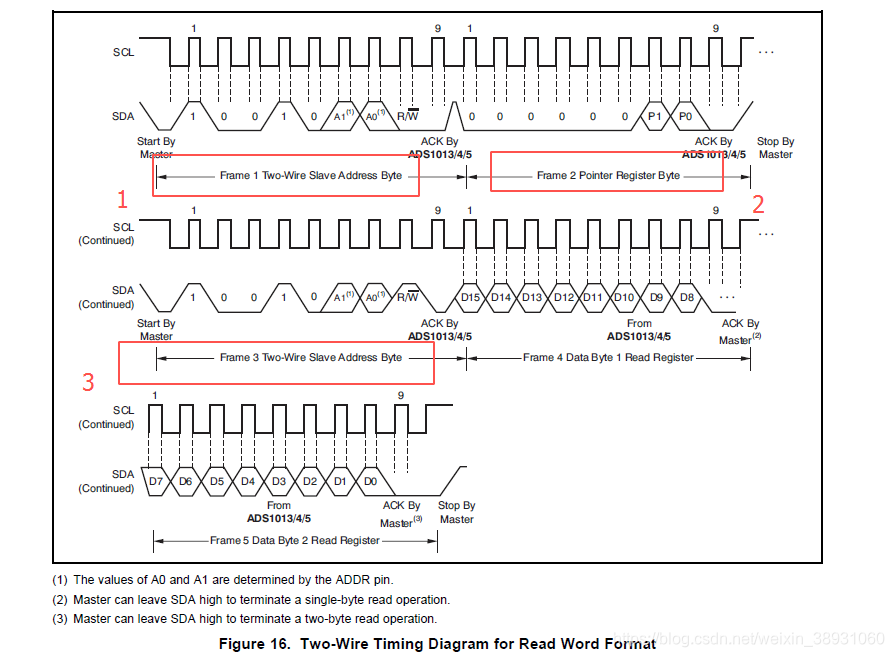
在这个时序中可以看出,我们是先发送一个写动作,但没有实际数据写入,然后在发送一个读指令。在sdk中写函数和读函数是分开的,所以我们在读取数据时,可能跟我们在使用模拟iic操作的时候不太一样。
u32XpsIic_ADS1015_Read(XIicPs *InstancePtr,u8Write_addr,u8ConReg_addr,u8Read_addr) { int status;u8buf[1]; buf[0] = ConReg_addr; status =XIicPs_MasterSendPolled(InstancePtr, buf,1,Write_addr); //先发送 写地址+转换寄存器地址if(status != XST_SUCCESS) {returnXST_FAILURE; } while(XIicPs_BusIsBusy(InstancePtr)); status =XIicPs_MasterRecvPolled(InstancePtr, ADS1015Buf,2, Read_addr); //在发送读地址进行读取数据if(status != XST_SUCCESS) {returnXST_FAILURE; }returnXST_SUCCESS; }
注意事项:
使用iic的接口函数进行开发时,从机的器件地址是7位的,不带读写位。比如你在调用读/写函数时,程序内部会在这个地址的后面自动的补上这个读写位,所以这也和上面提到的为什么sdk有单独的读写函数,也是基于这个原因。你调用写函数时,就会在后自动补上0;调用读函数时,就会在后面自动补1。
