为我大学的数字电路课程做的项目,目的是有一些很酷的东西放在你的桌子上。
在我的数字电路课程中,我们的任务是创建一个项目提案,主题可以自由选择,然后将课程中学到的知识应用到最终的项目中,该项目必须在虚拟电路模拟器中实现。我选择使用Wokwi,一个我在这个项目之前从未使用过的平台。经过一番思考,我决定制作一个音频频谱可视化器作为我自己办公桌的装饰品。经过一番研究,我发现这个想法已经被做过很多次了,因此不是很原创。因此,我决定以其中一个项目为基础,为交互式桌面装饰构建额外的功能。
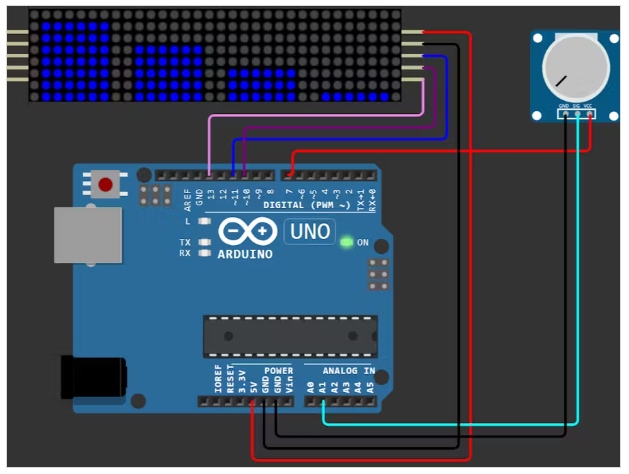
项目:
当我开始做这个项目时,我意识到我所选择的项目和我在提案中概述的项目与我所选择的平台不兼容。这是一个物理项目,使用了Wokwi上没有的库,而且我无法导入它们,因为我使用的是该平台的免费版本。我找了另一个项目作为基础,一个利用LED矩阵,但我找不到任何。我只找到了使用显示器的类似项目。所以,我必须从头开始,学习LED矩阵是如何工作的,它的库,以及如何操纵它。我开始创建列,然后使它们上下移动,最后使它们彼此独立。完成这一部分后,我开始研究音频频谱可视化是如何工作的,并从类似的项目中寻求灵感。我选择了被称赞的项目,因为它的代码看起来更可读,也就是在那时,我了解到fix_fft库的存在,它救了我的命。使用库,检查文档,并了解我受到启发的项目如何工作,我逐渐更改了我在LED矩阵中创建的列。
遇到的困难:
最初的想法是使用蜂鸣器和麦克风来显示移动的音频频谱。然而,该平台的麦克风传感器缺乏文档,似乎功能不全,因为它只产生噪音,而不检测蜂鸣器发出的声音。在教授的指导下,我用一个简单的电位器代替了蜂鸣器和麦克风,这个电位器可以模拟麦克风检测蜂鸣器声音的输出。我花了几个小时重新组织项目,并添加了最后的润色。但它是这样的:在最后期限内完成,比我最初计划的项目范围付出了更多的努力和工作。
代码
#include
#include "fix_fft.h"
#define CLK_PIN 13
#define DATA_PIN 11
#define CS_PIN 10
#define inAudio A0
#define inPot A1
char re[128], im[128];
void modLine(int line, int val1, int val2, int val3, int val4){
digitalWrite(CS_PIN, LOW);
/* The standard LED matrix is 8x8;
For some reason, Wokwi uses an 8x32 matrix, so it's as if there are 4 modules connected together.
Therefore, for every 8 columns, a new HEX value must be sent to control the next module.
It's not possible to use a loop or skip modules; each module must be updated every frame,
or the last modules will be treated as non-existent.*/
SPI.transfer(line);
SPI.transfer(val4); // Last 8x8 module
SPI.transfer(line);
SPI.transfer(val3);
SPI.transfer(line);
SPI.transfer(val2);
SPI.transfer(line);
SPI.transfer(val1); // First 8x8 module
digitalWrite(CS_PIN, HIGH);
}
void setup(){
Serial.begin(6900);
pinMode(CS_PIN, OUTPUT);
SPI.begin();
}
void loop(){
int i=0, j=0;
/*This is a conversion of the values I have to apply to the FFT;
FFT: "Fast Fourier Transform";
Basically, it's mathematics (i.e., magic) that converts a signal into sound frequency.*/
//Serial.println(analogRead(inAudio)); //Uncomment accordantly to visualize the frequency input
//Serial.println(analogRead(inPot)); //Uncomment accordantly to visualize the frequency input
for (i = 0; i < 128; i++){
int mic1 = analogRead(inPot); //Potentiometer so we can emulate a microphone
re[i] = mic1 / 4 - 128; // AnalogRead returns value from 0 to 1023, here, we convert it to go from -128 to 127
im[i] = 0; // Imaginary part of the FFT
}
/* Eu vou dar um BEIJO em quem criou essa bib.h*/
fix_fft(re, im, 7, 0);
int height[4] = {0, 0, 0, 0}; //Height for every column
static int prevHeight[4] = {0, 0, 0, 0}; //This for the climb/drop animation of the column of LEDS
int magnitude=0;
for (j = i * 16; j < (i + 1) * 16; j++){ //Considers only the first 64 frequencies
magnitude = magnitude + sqrt(re[j] * re[j] + im[i] * im[i]);
}
//Serial.println(magnitude); //Uncomment to see the resulting magnitude
for (i = 0; i < 4; i++) {
height[i] = map(magnitude * (i + 1) / 4, 0, 2080, 0, 8); //Divides and maps the frequency into 4 major groups that go from 0 to 8 each
height[i] = constrain(height[i], 0, 8); // Guarantees that the value is between 0 e 8
//Serial.println(height[i]); //Uncomment to see the height of each column
}
for (int i = 0; i < 4; i++) { //Here were doing the animation previously mentioned
while (prevHeight[i] != height[i]) {
if (prevHeight[i] < height[i]) {
prevHeight[i]++;
} else {
prevHeight[i]--;
}
for (int j = 0; j < 8; j++) {
int line = 8 - j;
int val1 = (j < prevHeight[0]) ? 0x7E : 0x00;
int val2 = (j < prevHeight[1]) ? 0x7E : 0x00;
int val3 = (j < prevHeight[2]) ? 0x7E : 0x00;
int val4 = (j < prevHeight[3]) ? 0x7E : 0x00;
modLine(line, val1, val2, val3, val4);
}
delay(10); //Slows down the process so that the animation is smoother
}
}
}
本文编译自hackster.io


